

How to Wax a Snowboard: Tips for Better Glide
Quick Summary
Wax a snowboard every three to five days of riding, or after a rough trip, and choose the bar by temperature: a cold-temp snowboard wax for dry powder and an all-temp bar for mixed days. Check the base for a dull, pale, white-spotted finish, which means the wax is gone.
- Wax every three to five days of riding, or after a rough trip on rocks or hard pack.
- Cold, dry snow calls for a harder cold-temp bar; warm, wet snow needs a softer formula.
- Keep an all-temp bar for changing days and a cold-temp bar for deep cold.
- Hot wax at a low-to-medium iron setting with no steam, and keep the iron moving.
- Let the wax cool to room temperature, then scrape tip to tail in one direction.
Table of Contents
- How Often a Snowboard Needs Wax
- Picking Snowboard Wax by Temperature
- Hot Wax or Rub-On: What Works on Your Setup
- How to Wax a Snowboard With an Iron
- How to Scrape and Brush Snowboard Wax
- Common Waxing Mistakes That Slow You Down
- Stock Up on Wax Before Your Next Session
- Frequently Asked Questions
How to Wax a Snowboard: Tips for Better Glide
Last Updated: November 3, 2026
Snowboard wax is the cheapest speed upgrade you can give your board, and most riders in the Midwest let it slide far too long. Boards with dry, grey bases drag through every turn, and a proper wax job wakes the base back up. This guide walks through when to wax, how to pick the right bar for the cold, and how to get a clean, fast finish at home.
How Often a Snowboard Needs Wax
Most riders should wax every three to five days of riding, or after any trip where the base took a beating on rocks or hard pack. The clearest sign is a board that feels slow on flats and sticky on the chairlift ride back up. Look at the base too. A dull, pale finish with white spots means the wax is gone.
Heavy use in icy or abrasive snow wears wax down faster, so check the base after each day if you ride park or hit a lot of rails. A quick scrape of an old bar will show you how much is left.
Picking Snowboard Wax by Temperature
Temperature decides which wax works best, so start by checking the forecast. Cold, dry snow calls for a harder wax that holds its shape. Warm, wet snow needs a softer formula that grabs and releases well. If you ride a mix of conditions, one all-temp bar covers the basics.
For a single bar that handles changing days, the Wizard Wax All Temp 3oz is a solid pick at $15.99. It is built as a hybrid blend and works across most snow types. If you ride mostly deep cold, the Wizard Wax Cold Temp 3oz at $15.99 is made for below 20°F and dry powder days.

Wizard Wax All Temp 3oz
Keep a cold-temp bar and an all-temp bar in your bag if the weather swings hard. Swapping between them takes one minute and makes a real difference on the hill.
Hot Wax or Rub-On: What Works on Your Setup
Hot waxing melts the wax into the base with an iron. It takes more time and more care than a rub-on bar. Rub-on wax is quicker, works fine for a mid-session refresh, and needs no iron. Plenty of riders use rub-on between full hot-wax sessions.
If you want the best long-term performance, the Nitrous Hot Wax at $17.99 is designed for an iron but also works as a rub-on when you are out of time. The Indy Hot Wax All Temps at $23.99 carries a synthetic fluorine blend for extra slip in most conditions, and it is rated for hot waxing with rub-on as a backup.


Match the wax to how you ride. Riders who want a deeper coat for the season can hot wax. Riders who go out a few times a month can get by with rub-on.
How to Wax a Snowboard With an Iron
Set up in a warm, ventilated spot, a garage with the door cracked works, but avoid a hot garage in summer or a board left in direct sun, since a base that is already warm will take wax unevenly and cool too slowly. Lay the board base-up on a bench or a pair of waxing stands, and have your wax, iron, scraper, and brush within reach before you start. Room temperature is the target; if you can see your breath, the wax will cool too fast to soak in.
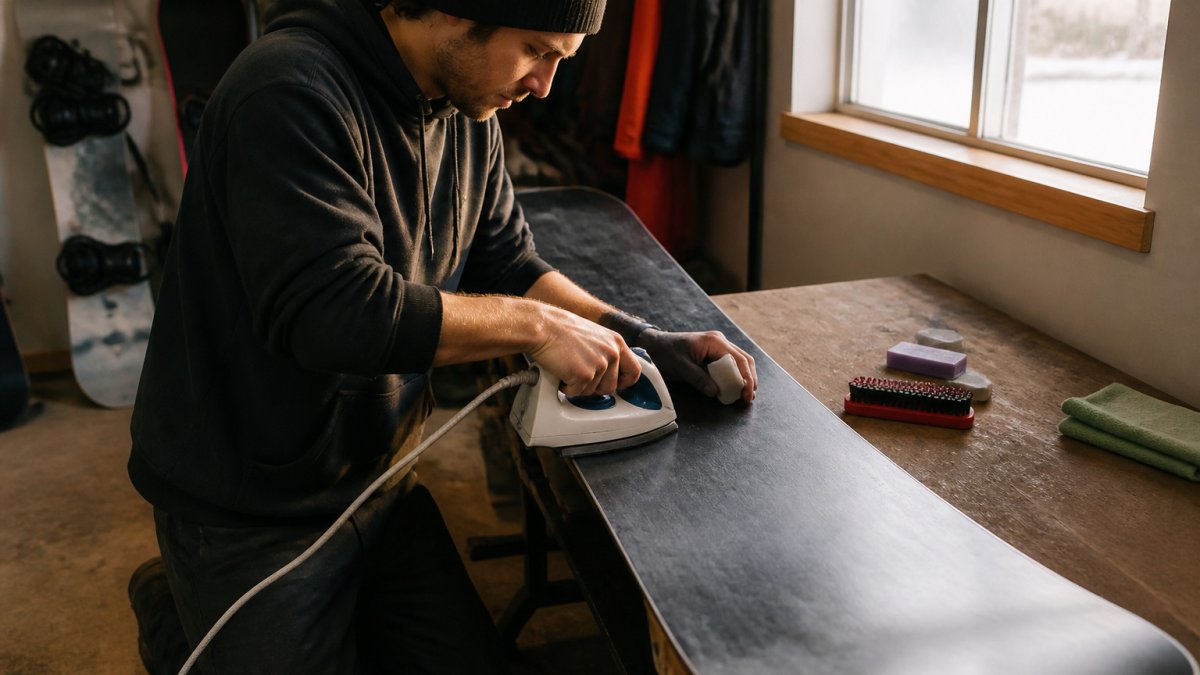
Set the iron to a low-to-medium setting with no steam, and start at the low end of the range on the wax bar. Hold the wax bar against the iron and let it drip in a steady line down the base, moving the iron slowly from tip to tail. Work in one section at a time so the wax spreads evenly. Once the base has a thin, even coat, let it cool completely before you scrape.
Take your time on the first few boards so you learn how the wax flows at your iron setting.
Iron Temperature and Protecting the Base
Keep the iron moving at all times and never let it sit still on one spot. If you see smoke or the base starts to bubble, lift the iron and let the board cool before you continue.
Wipe the sole plate clean before and after each job so leftover wax does not transfer to the next board.
Check the iron setting against the wax manufacturer's range on the bar rather than guessing. Keep the iron off the metal edges, heat can affect edge tune, and hold the scraper flat when you get to the finishing stage.
How to Scrape and Brush Snowboard Wax
Once the wax has cooled to room temperature, use a plastic scraper held at a low angle and push from tip to tail in overlapping passes. The goal is to remove the excess wax that sits on top and leave the wax that has soaked into the base.
The 10in Scraper Castlerock makes this easy, with a solid edge that clears wax cleanly. Keep the scraper sharp, a burr on the edge will chatter and skip instead of cutting, and scrape in one direction rather than sawing back and forth, which just pushes wax back into the structure.
After scraping, brush the base in long strokes, tip to tail, starting with a stiff brush and finishing with a softer one.
If you hit a lot of rails in the park, expect to scrape and brush more often than you would on snow alone.
Once the wax has cooled, the scraping and brushing steps come down to a few simple checks.
Step |
What to do |
Time or frequency |
|---|---|---|
Cool |
Let wax reach room temperature |
Fully cool before scraping |
Scrape |
Push a plastic scraper tip to tail at a low angle |
Overlapping passes, one direction |
Brush stiff |
Long strokes tip to tail with a stiff brush |
First brushing pass |
Brush soft |
Finish with a softer brush |
Final pass |
Test |
Short ride or clean run to check the feel |
After finishing |
Common Waxing Mistakes That Slow You Down
Before waxing, clean the base with a dedicated base cleaner.
Other mistakes include scraping too early while the wax is still warm, using the wrong temperature bar, and leaving a thick, uneven coat.
Also watch the edges, and keep the iron away from the metal edges.
Stock Up on Wax Before Your Next Session
A regular waxing routine keeps your board running well through the season. Keep a cold-temp bar, an all-temp bar, and a hot-wax option in your garage. Pair them with a scraper, a brush, and a base cleaner, and you can handle any day the mountain throws at you.
Stop by Cal Surf to browse our full range of snowboard wax, or grab what you need for your next session.
Frequently Asked Questions
What is the rule for waxing?
A quick check is to look at the base: if it appears pale or dull instead of smooth and slightly glossy, it is time for a fresh coat. A bar of Indy Hot Wax All Temps in your bag makes a fresh coat easy to apply on the go.
Can you wax a snowboard without an iron?
Yes. Some waxes, including Nitrous Hot Wax, are designed to work as a rub-on when you do not have an iron or time to set one up. Rub-on wax gives a lighter layer that is useful for a quick refresh between sessions.
Should you scrape all the wax off a snowboard?
Scrape after the wax has fully cooled, then brush it out. Scraping removes excess wax that would otherwise sit on top of the base and slow you down, but you want a thin layer left in the structure of the base. Use a plastic scraper and work in long strokes from tip to tail.
How long should snowboard wax cool before scraping?
Let the wax cool until it is hard to the touch before you scrape. Once cooled, scrape and brush as described above before you ride.
